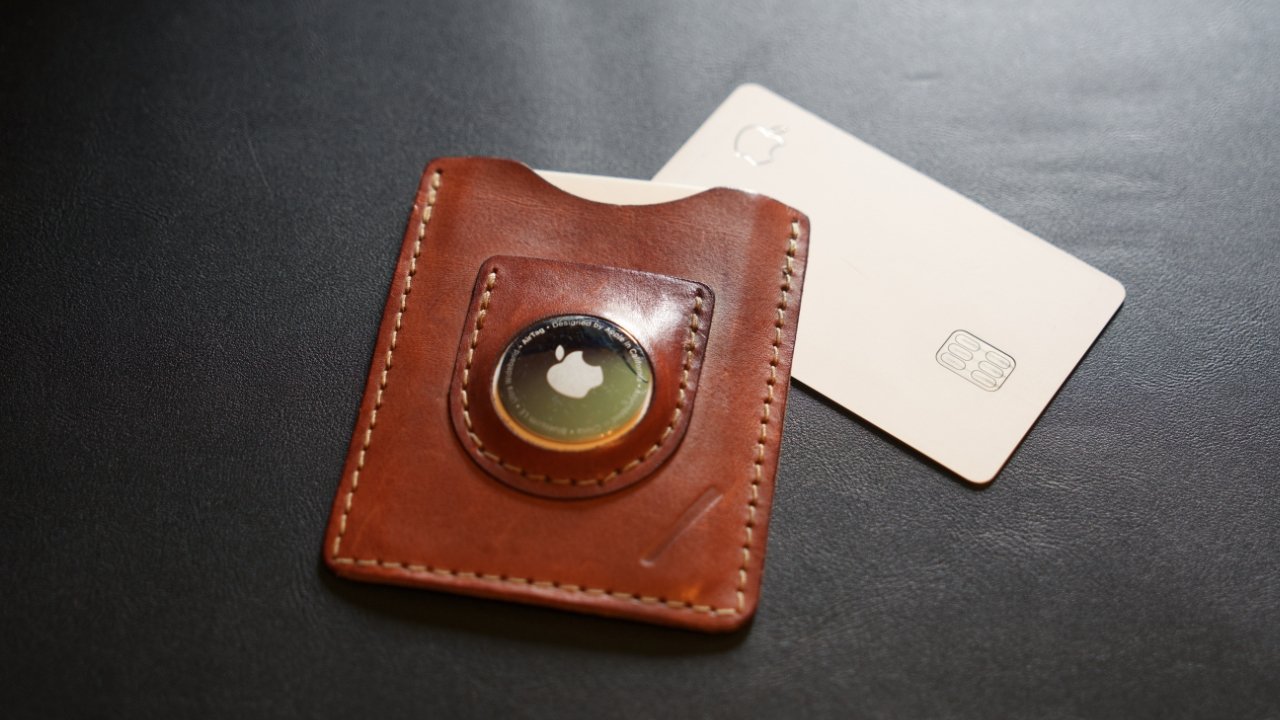
To put an AirTag in your wallet, first ensure the wallet is compatible with the device’s size and signal. The main caveat is that you may need an insert, adhesive holder, or slim card-style accessory if your wallet lacks a dedicated AirTag pocket. Check that the wallet has an open compartment for a snug fit and that its material won’t block Bluetooth—though AirTags work through most common materials. Once confirmed, activate the AirTag, pair it with your iPhone, and secure it using a holder or Velcro strips for reliable tracking.
Step 1: Ensuring Wallet Compatibility
Before you can put your Airtag in your wallet, it's important to ensure that your wallet is compatible with the Airtag's size and functionality. Airtags are small, lightweight tracking devices that are designed to fit discreetly inside your belongings, including your wallet.
When choosing a wallet for your Airtag, consider the size and weight of the device. Airtags are small and slim, so they should easily fit into most wallets without adding bulk or discomfort. However, it's still a good idea to check the dimensions of your wallet's compartments to ensure a snug fit.
Additionally, ensure that your wallet has an open or accessible compartment where you can securely place the Airtag. Some wallets have dedicated pockets or slots specifically designed for tracking devices, while others may require you to find a suitable spot within the existing compartments.
It's also worth considering the material of your wallet. Airtags utilize Bluetooth technology to connect to your iPhone, so it's important to ensure that your wallet's material doesn't obstruct the signal. Consider that some wallet materials could potentially affect signal strength, though AirTags are designed to work through most common wallet materials.
If you're unsure about the compatibility of your wallet, you can always check the manufacturer's specifications or consult customer reviews to see if others have successfully used Airtags with similar wallet models.
Once you have confirmed that your wallet is compatible with the Airtag, you're ready to move on to the next step of preparing your Airtag for placement in your wallet. This involves activating the Airtag and ensuring it is ready to be paired with your iPhone for seamless tracking functionality. Precision Finding is a feature that allows you to locate your Airtag with greater accuracy when you are within range, using compatible iPhones with the U1 chip. For securing the device, the easiest way is to use a wallet insert or holder made for AirTag, then slide the AirTag into that holder and place it in a card slot or dedicated pocket. If your wallet has no AirTag pocket, you can use an adhesive holder or a slim card-style accessory instead. Adhesive holder: One simple and effective way to secure the Airtag is by using an adhesive holder designed for AirTag. You can attach the holder to the desired spot in your wallet and slide the AirTag into it. Velcro strips: Another option is to use a wallet insert with Velcro strips designed for AirTag, attaching one strip to the insert and another to the spot in your wallet where you want to place it. Elastic bands or clips: If your wallet has a larger compartment or a pen holder, you can use a slim AirTag holder with an elastic band or clip designed to secure the AirTag in place.
Step 2: Preparing Your Airtag
Before you can put your Airtag in your wallet, you need to ensure it's properly set up and ready for use. Here are the steps to prepare your Airtag:
1. Remove the plastic tab: Start by removing the plastic tab from the Airtag. This will activate the device and make it ready for pairing with your iPhone.
2. Set up your Airtag: Make sure your iPhone is nearby and unlocked. Hold the Airtag close to your iPhone, and a prompt will appear on your screen to start the setup process. Follow the on-screen instructions to pair the Airtag with your iPhone.
3. Customize your Airtag: Once the pairing process is complete, you can customize your Airtag by giving it a name and assigning it to specific items, such as your wallet. This will make it easier to identify the item it's attached to in the Find My app.
4. It is available automatically when you are near your Airtag—no toggle is needed in the Find My app.
5. Test the Airtag: Before placing the Airtag in your wallet, it's a good idea to test its connectivity and tracking capabilities. Attach it to a keychain or another easily accessible item and use the Find My app to locate it. Ensure that you can track its location accurately and that the signal strength is strong.
Once you have completed these steps and confirmed that your Airtag is set up and functioning properly, you're ready to move on to the next step of choosing the right spot in your wallet to place the Airtag.
Step 3: Choosing the Right Spot in Your Wallet
Now that your Airtag is ready to go, it's time to choose the perfect spot in your wallet to place it. Here are some factors to consider when selecting the right spot:
Accessibility: You want to choose a spot in your wallet that allows easy access to the Airtag. This will come in handy when you need to locate your wallet using the Find My app. Consider a compartment or pocket that is easily reachable and doesn't require you to dig deep into your wallet.
Security: It's essential to place the Airtag in a secure location to prevent it from falling out or getting lost within your wallet. Look for a pocket or slot that provides a snug fit for the Airtag, ensuring it stays in place during your travels.
Signal Strength: The Airtag relies on a Bluetooth connection with your iPhone for tracking purposes. It's best to choose a spot that allows for a clear signal transmission.
Discreetness: Depending on your preferences, you may want to keep the Airtag hidden or subtly placed within your wallet. Look for a discreet compartment or pocket where the Airtag can be concealed, so it doesn't attract unwanted attention or bulk up your wallet unnecessarily.
Protection: Consider the materials and features of your wallet that can provide additional protection for the Airtag. Some wallets have RFID-blocking technology to prevent unauthorized scanning of your cards, which can also help shield the Airtag from external interference.
Once you have taken these factors into account, carefully choose the spot in your wallet that fulfills your requirements and preferences. Remember, everyone's wallet is different, so it may take some experimentation to find the perfect location for your Airtag.
With the right spot chosen in your wallet, you're now ready to move on to the next step of securing the Airtag to ensure it stays in place during your travels.
Step 4: Securing the Airtag in Your Wallet
Now that you have chosen the ideal spot for your Airtag in your wallet, it's important to secure it properly to ensure it stays in place during your travels. Here are some methods you can use to secure the Airtag:
Just make sure the holder does not obstruct the Airtag's signal or damage your wallet's material.
The Velcro will provide a secure hold while also allowing you to remove and reattach the Airtag as needed.
Ensure a snug fit so the Airtag stays put.
Customized Airtag accessories: Some companies offer customized accessories specifically designed to secure Airtags in various items, including wallets. These accessories provide a secure and stylish way to attach the Airtag to your wallet without the need for extra tape or adhesives.
Regardless of the method you choose, it's important to ensure that the Airtag is securely fastened and won't easily come loose. You don't want to risk losing your Airtag or having it fall out of your wallet during your travels.
Once the Airtag is properly secured, give it a gentle tug to confirm that it is firmly in place. If it doesn't budge, you have successfully secured the Airtag in your wallet.
Now that the Airtag is securely fastened, it's time to proceed to the final step of testing the Airtag's connectivity and functionality.
Step 5: Testing the Airtag's Connectivity
After placing and securing the Airtag in your wallet, it's important to test its connectivity to ensure that it functions properly and can be tracked using the Find My app. Here's how you can test the Airtag's connectivity:
1. Open the Find My app: Open the Find My app on your iPhone. This app allows you to locate and track your Airtag, ensuring you can find your wallet if it goes missing.
2. Check the Airtag's status: In the Find My app, you should see the status of your Airtag displayed. It should show as connected and ready for tracking.
3. Test the tracking feature: To test the tracking feature, move away from your wallet with the Airtag. As you create distance, you should see the Airtag's location update on the map in the Find My app. This indicates that the Airtag is successfully transmitting its location.
4. Test the proximity feature: The Airtag also has a proximity feature that can guide you to its location. Move closer to your wallet with the Airtag, and you should see the signal strength indicator in the Find My app increase. This feature can be especially helpful if your wallet is misplaced in a larger area.
5. Ensure you have a strong Bluetooth connection: The Airtag relies on Bluetooth technology to connect to your iPhone. Make sure that your iPhone's Bluetooth is enabled and that you have a strong and stable connection to ensure accurate tracking.
If the Airtag is accurately tracking your wallet's location and the signal strength is consistent, then you have successfully tested the Airtag's connectivity. You can have peace of mind knowing that your wallet is easily traceable in case it gets lost or misplaced during your travels.
Remember to periodically check your Airtag's battery level in the Find My app and replace the battery as needed to ensure uninterrupted tracking functionality.
With the Airtag tested and functional, you can embark on your travels with the confidence that your wallet is well protected and easily traceable, thanks to this smart tracking device.
Conclusion
Congratulations! You've successfully learned how to put an Airtag in your wallet and enhance its functionality with this innovative tracking device. By following the steps outlined in this guide, you can ensure that your wallet is secure, easily traceable, and protected during your travels. Travel essentials and accessories play a crucial role in making your journeys more convenient and enjoyable, and the addition of an Airtag to your wallet can provide you with a sense of peace and security.
Remember to choose a wallet that is compatible with the Airtag's size and features, and consider factors like accessibility, security, and signal strength when selecting the perfect spot for the Airtag in your wallet. Use an adhesive holder designed for AirTag, a wallet insert with Velcro strips, or a slim AirTag holder with an elastic band or clip to securely fasten the Airtag to the chosen location. Finally, test the Airtag's connectivity by using the Find My app, ensuring that the tracking and proximity features are working as expected.
With an Airtag in your wallet, you can rest assured that you have a reliable method to locate your wallet if it goes missing. Whether you're traveling to a bustling city or exploring remote destinations, the peace of mind provided by the Airtag is invaluable.
Remember to keep an eye on the Airtag's battery level and replace it as needed to maintain seamless tracking functionality. It's also worth noting that Airtags are not a guaranteed solution to prevent theft or loss, but they can significantly increase the chances of recovering your wallet.
Now that you're equipped with the knowledge on how to use an Airtag in your wallet, you can confidently embark on your future travels knowing that your essential belongings are protected and easily traceable.
So, go ahead and make the most of your adventures, knowing that your wallet is always within reach, thanks to the power of technology and smart travel essentials like the Airtag!
Related travel guides: How To Put Airtag On Ridge Wallet, How To Avoid Pickpockets While Traveling | Anti Pickpocket Gadgets, and Where Do You Put Coins In A Wallet.